The internet is full of reference material on how developer tooling is built and how it works under the hood. We find "usage stories" more interesting — the simplest possible sequence of steps that you can just repeat on your own project. What follows is exactly that kind of story: how to set up the Git version control system on a project. Nothing superfluous.
Why another Git guide
Plenty of theory has been written about Git, and most of it is excellent. The problem lies elsewhere: when version control has to be set up on a real project today, a developer needs a sequence of actions, not an architecture overview. That is why our knowledge base publishes instructions — from the very first command to a settled working process.
In our knowledge base we publish "usage stories" — the simplest, most step-by-step instructions we can write.Chief Technology Officer
The exchange scheme
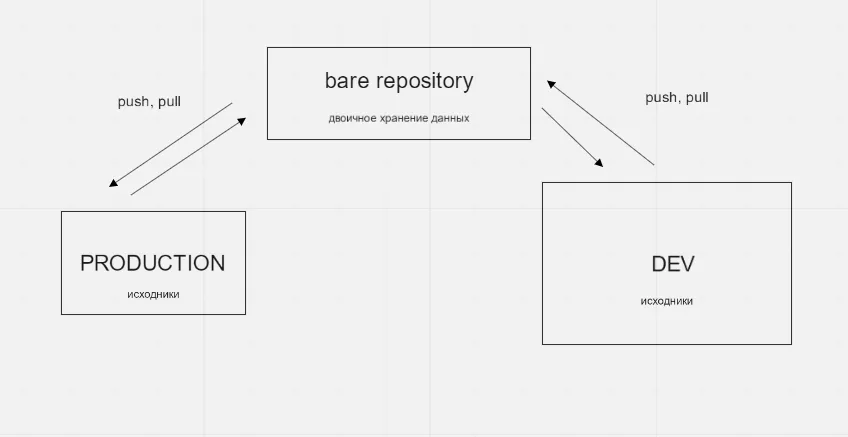
To work comfortably in a direct-commit mode with the commands git push origin master and git pull origin master, we use a scheme built around a bare repository (the central one).

Each part of the scheme can live on a separate server, on two servers, or all of it on a single server. Everything depends on the paths to the remote branches.


PRODUCTION
The project's live code. This is where we create .gitignore, run git init, and from here we upload the code to the central repository for the first time.
Bare repository
The central repository with no working copy. The exchange point: changes are pushed here and pulled from here.
DEV
A clone of the central repository. This is where the work on tasks happens — each one in its own branch.
Placement
Different servers, two servers or one — the scheme itself does not change. Only the paths to the remote branches do.
Creating the DEV repository
- Create .gitignore on PRODUCTION. In the project root, create a .gitignore file and list in it everything that is not part of the code that will change and that, by its nature, should not fall under version control.
- Initialise the repository. After that, run git init.
- Make the bare version. Go to the server or the directory where the bare repository will live, and create the bare version there: git init --bare.
- Note down the path to the repository. Check where you have ended up: pwd returns, for example, /var/www/sven/data/www/github.
- Add the remote alias. Go back to PRODUCTION and register the bare repository as origin: git remote add origin ssh://sven@o.aniart.com.ua/var/www/sven/data/www/github.
- Make sure everything is fine. The git remote -v command should show that same address twice — once for fetch and once for push.
- Upload the code. From PRODUCTION, push all the code to the bare repository: git push origin master.
- Clone DEV. Go to the server (to the directory) where DEV will live and clone everything you have just uploaded from the bare repository: git clone ssh://sven@o.aniart.com.ua/var/www/sven/data/www/github. This sets up the origin alias straight away.
The .gitignore file from our example project looks like this:
- download/
- images/
- song_1.mp3/
- video/
If you prefer, you can do the same thing step by step, without cloning: git init, then git remote add origin ssh://sven@o.aniart.com.ua/var/www/sven/data/www/github and git pull origin master. All of this is described in great detail in the Git documentation.

Useful commands and flags
| Command | What it does |
|---|---|
| git remote -v | Shows which aliases are configured — on separate lines for fetch and for push. |
| git rm --cached -r images | Removes from version control anything that ended up there by mistake. Most often that means images and the download directory. |
| git rm --cached -r song_1.mp3 | The same for a single large file. |
| git pull --allow-unrelated-histories dev master | Saves the day when the repositories share no common ancestor commit. |
| git checkout -b serverfix origin/serverfix | Sets a remote branch to be tracked by a local one — saves a great deal of time otherwise spent spelling out aliases and branches. |
| git push origin serverfix:SVEN-5 | "Take my serverfix and make it the remote SVEN-5." |
Creating a local branch with git checkout from a remote branch automatically creates what is called a tracking branch. Tracking branches are local branches directly linked to a remote one. If you type git push while you are on a tracking branch, Git already knows which server and which branch to push the changes to. In the same way, running git pull on one of those branches first fetches all the remote references and then automatically merges in the corresponding remote branch.
The git push origin serverfix:SVEN-5 form can be used to push a local branch into a remote branch with a different name: your local serverfix ends up in the SVEN-5 branch of the remote project.
The DEV working routine
For every assignment or individual task we follow the same cycle.
- Create a branch. git checkout -b SVEN-5 — from then on, all the work happens in it and nowhere else.
- Do the work. Write the code, add the files you need.
- Commit the changes. git add ., then git commit -am "what the work was about".
- Merge into master. git checkout master, then git merge SVEN-5.
- Push to the central repository. Once you have approval to release to PRODUCTION, run git push origin master. The changes are then pulled from the central repository onto master.
- Clean up after yourself. Old branches can be deleted: git branch -d SVEN-5.
- git branch --merged — shows which branches have already been merged and can be deleted (all of them except the current one, marked with an asterisk).
- git branch --no-merged — shows which branches have NOT been merged and still contain changes.
Committing changes and working with the index
The standard way to commit changes
- Option 1. Add the changed files to the index before committing: git add filename1 filename2, then git commit.
- Option 2. Add every file — changed, new and deleted: git add ., then git commit.
If something ended up in the index by mistake
If something went wrong, you can always remove accidentally added files from the index before you commit.
- git reset filename1 — remove a specific file from the index.
- git rm --cached filename1 — the same thing done another way.
- git reset HEAD — reset the whole index completely.
How to restore files and undo changes
Restore a file from one of the previous commits
You will need the commit identifier and the file name: git checkout commit-id file-name. In practice it looks like this: git checkout 2378d5ad6e3d5fc87df858678c226d9fc9c47c66 temp.tmp. To find the identifier, look at git log.
Remove from the index a file that should not be there
- Add the file to .gitignore. So that it no longer falls under version control.
- Exclude it from the index. git rm --cached filename.
- Commit. Without a commit the change is not recorded.
How to bring a changed file back
- git reset --soft id-commit — drop the commit from the branch but leave the index and the file tree untouched.
- git reset --hard id-commit — drop the commit, the index and the files back to the state of the specified commit.
Branches, tags and temporary storage
Working with branches
- git branch new-branch — creates a new branch called new-branch based on the current one.
- git checkout branch — switching between branches.
- git merge — merging branches and resolving any conflicts along the way.
Tags
- git tag stable-1 — creates a "lightweight" tag attached to the latest commit. If the tag already exists, another one will not be created.
- git tag -d stable-2 — delete a tag.
- git tag -l — list the tags.
Temporarily "hiding" changes
This situation comes up often: while you are working on part of your project, everything is in a messy state, and you need to switch branches to spend a little time on something else. The trouble is that you do not want to commit half-finished work just so you can come back to this exact state later. The answer to this problem is the git stash command.
- git stash — the changes are no longer visible to Git.
- git stash list — look at the list of stashed work: stash@{0}: WIP on master: 049d078 added the index file, stash@{1}: WIP on master: c264051... Revert "added file_size", stash@{2}: WIP on master: 21d80a5... added number to log.
- git stash apply — restore the most recently stashed work.
- git stash apply stash@{2} — apply one of the older stashes by naming it.
Commit history and analytics
Information about the commit history can be obtained at various levels of detail.
| Command | Level of detail |
|---|---|
| git log | Basic statistics on the commits. |
| git log --stat | Detail for each commit. |
| git log --summary | A summary of the history. |
| git log -p | Detail for each file. |
| git diff filename | Changes in a specific file. |
| git diff --cached | Changes added to the index. |
| git show | Changes introduced by a single commit. |
Did you enjoy this tip? Write to us and tell us what else you would like to learn about.